Monday 20 September 2021

DJI Camera Replacment Gimbal Calibration FIX!!! Fix For Phantom 1, Phantom 2, Inspire 1, Phantom 3, Matrice 100, Phantom 3, Agras MG-1, Phantom 3 4K, Phantom 4 , Matrice 600, Mavic Pro, Inspire 2, Phantom 4 Pro, Matrice 200, Agras MG-1S, Phantom 4, Spark, Mavic Air, Phantom 4 Pro V2, Mavic 2 Pro/Zoom, Mavic 2 Enterprise, Mavic 2 Enterprise Dual, Mavic Mini, Mavic Mini 2, Mavic Air 2, (MAVIC) AIR 2S,Gimbal IMU Data error (Code: 40021)

DJI Camera Replacment Gimbal Calibration FIX!!! 

How to fix and replace DJI Gimbal. Software Side.

Fix For Phantom 1, Phantom 2, Inspire 1, Phantom 3, Matrice 100, Phantom 3, Agras MG-1, Phantom 3 4K, Phantom 4 , Matrice 600, Mavic Pro,  Inspire 2, Phantom 4 Pro, Matrice 200, Agras MG-1S, Phantom 4,  Spark, Mavic Air, Phantom 4 Pro V2, Mavic 2 Pro/Zoom, Mavic 2 Enterprise, Mavic 2 Enterprise Dual, Mavic Mini, Mavic Mini 2, Mavic Air 2, (MAVIC) AIR 2S, Gimbal IMU Data error (Code: 40021)


I'm Mainly here to try and Make your life easier. I had Issues with my DJI MINI 2 when I broke the camera gimbal. This will fix all the above DJI Drones


My Story

I flew into a tree and broke the gimbal of my camera on my DJI MINI 2 and searched hard to find out how to  Software fix after replacing the gimbal. Below is my old broken gimbal


HOW TO FIX SOFTWARE IMU Calibration Error


DISCLAIMER: All Dark RED Highlighted Links support me by running adds so please consider turning off adblocker. It buys me a COFFEE

What You need:

  • DJI Drone (DJI Mini 2 is used in this example)
  • PC (Windows 10, Mac, or Linux)
  • USB-C Cable or cable compatible with your drone.  
  • DJI Assistant (Download one that supports your drone)http://fumacrom.com/2CRw9 or  https://www.dji.com/uk/downloads/softwares/assistant-dji-2-for-mavic
  • Latest Python for your operating system:  http://fumacrom.com/2CRwz or  https://www.python.org/downloads/ (Windows Version)
  • DJI Firmware Tools:     http://fumacrom.com/2CRxh  or   https://github.com/o-gs/dji-firmware-tools/archive/master.zip
  • PYserial: Download "tar.gz" File type - http://fumacrom.com/2CRyA or https://pypi.org/project/pyserial/#files
  • 7zip: http://fumacrom.com/2CRzG or https://www.7-zip.org/a/7z1900.exe (Any archive tool capable of opening .tar.gz files will work)
  • Drone code name a list will be provided.  E.g WM240, WM245, WM160
  • A level surface for calibration
  • Save everything to Desktop to make life EASY 

Download and Install Python

Download Python installation linked above.  Any latest version of Python 3 should work.  I chose to install Python with a ‘Custom Installation’ to C:\DJI\python\  and Add Python to environment variables which allows it be ran by just typing ‘python or py’ in the command line. Having issues installing? carry on reading. Python is easy to run because you just type ‘python’ however I used a short path C:\DJI for all of these extractions so that it is easy to navigate to from the command line which we will be doing shortly.

If you get hit with this Error "How to Fix Python Was Not Found Run Without Arguments to Install From the Microsoft Store Error" then follow the Steps from this video: https://www.youtube.com/watch?v=uBnbVqUmZaQ     I followed step 1 which fixed the issue.


Download & Extract pyserial

The pyserial archive is a .tar.gz file.  This is a tarball archive (.tar extension) with GNU Zip (.gz extension) which is basically a different type of zip archive that Windows does not natively support. Because of this you will need to use 7zip, which is linked above, or another compatible utility to extract the pyserial files. After installing 7zip or another compatible tool just open the pyserial-3.4.tar.gz file.  Because of the way .tar.gz files are archived you will go through a few folder levels before you get to the actual needed content folder.  I extracted pyserial to C:\DJI\pyserial


Download & Extract DJI Firmware Tools

I extracted the DJI Firmware Tools folder dji-firmware-tools-master contents using 7zip to C:\DJI\firmware-tools Make sure you review the README.md file to understand what these tools do and how they operate! 

Download and install DJI Assistant

Once downloaded, start the software and connect your Drone via USB and turn on. This is an Important part as it allows your Drone to be read in "Ports" in your "device manager" which will allow you to run your script. Once DJI Assistant can see your drone, close the application. 

Connect your DJI Drone and Find the COM Port

Place your drone on a level surface and make sure it is still on and connected Via USB.  There is no need to connect the controller.

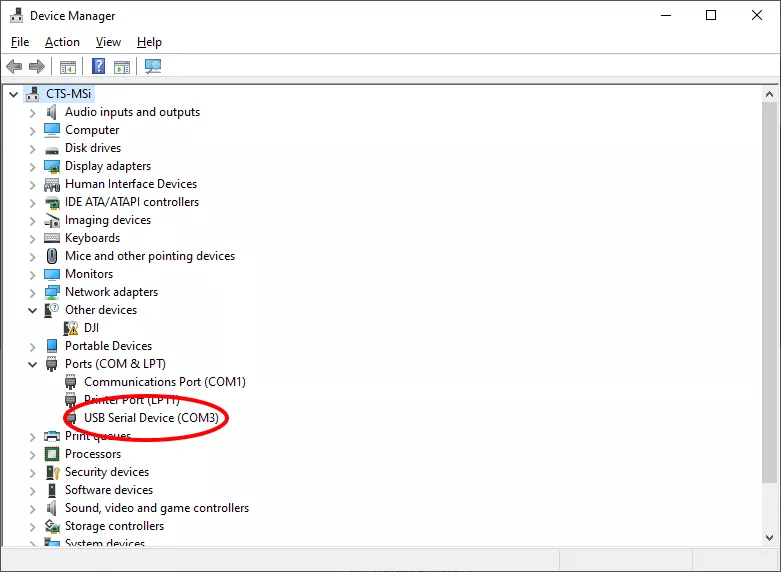
To find the COM port your USB connection is using press the Win+X keys (The ‘Win’ key or Windows Key is usually between Ctrl and Alt on the left side of your keyboard with the Windows logo on it) to open the Power Users menu and select Device Manager. Search for Ports (COM & LPT) section and you should see USB Serial Device (Or Drone name) (COM#). Your COM Number might be different. If there are multiple devices you can disconnect and reconnect the drone to see which device disappears and reappears.  Note down the COM port number because you will need it later for running the script.  


Install pyserial

Now we need to open an Administrator Command Prompt.  Open up (Admin) Command Prompt (CMD) or Windows PowerShell (Admin) and accept the User Account Control warning about making changes to your device.

Once you are in Command Prompt we need to navigate to the pyserial folder we just extracted and install pyserial.  to do this use these commands.  If you extracted to a different folder you will need to substitute that folder in the commands below. 

I.e Copy Folder location 


In (Admin CMD) Administrator Command Prompt type "cd " spacebar  then paste the file location that you copied with "CTRL + V" . It should look like the image below. Then press enter. 


once you pressed enter it should look like this below. Now you're in the folder and we want to 

run a program from here using this script " python setup.py install ".


You want to enter in "python setup.py install" and it should look like this... Then

press enter. It should run the code and install the files needed. (I already installed

the files, so no need for me to do again. This part is done.


Calibrate the Gimbal

THE WAIT IS OVER!  We need to navigate to the DJI Firmware Tools folder and execute the commands to get our gimbal re-calibrated.  Just like how I showed you above "cd  " (copy and paste folder location) (the highlighted part is the file location.  image shown below). 


it should look like this below. press enter.

Once you pressed 'enter' you should see this. This means you are in the folder and are ready to run the code 

to calibrate and help Fix your Drone. 

NOW BEFORE WE DO ANYTHING. We will need the "Com#" number from earlier and the model name of your drone. Pick your drone from the list below (I will try my best to update list if need be).  


  •     A2     =  0 # Released 2013-09-04 A2 Flight Controller
  •     P330   =  1 # Released 2013-01-07 Phantom 1
  •     P330V  =  2 # Released 2013-10-28 Phantom 2 Vision
  •     P330Z  =  3 # Released 2013-12-15 Phantom 2 w/ Zenmuse H3-2D
  •     P330VP =  4 # Released 2014-04-07 Phantom 2 Vision+
  •     WM610  =  5 # Released 2014-11-13 Inspire 1
  •     P3X    =  6 # Released 2015-03-09 Phantom 3 Professional
  •     P3S    =  7 # Released 2015-03-09 Phantom 3 Advanced
  •     MAT100 =  8 # Released 2015-06-08 Matrice 100
  •     P3C    =  9 # Released 2015-08-04 Phantom 3 Standard
  •     MG1    = 10 # Released 2015-11-27 Agras MG-1
  •     WM325  = 11 # Released 2016-01-05 Phantom 3 4K
  •     WM330  = 12 # Released 2016-03-02 Phantom 4 
  •     MAT600 = 13 # Released 2016-04-17 Matrice 600
  •     WM220  = 14 # Released 2016-09-28 Mavic Pro 
  •     WM620  = 15 # Released 2016-11-16 Inspire 2
  •     WM331  = 16 # Released 2016-11-16 Phantom 4 Pro
  •     MAT200 = 17 # Released 2017-02-26 Matrice 200
  •     MG1S   = 18 # Released 2017-03-28 Agras MG-1S
  •     WM332  = 19 # Released 2017-04-13 Phantom 4 Advanced
  •     WM100  = 20 # Released 2017-05-24 Spark
  •     WM230  = 21 # Released 2018-01-23 Mavic Air
  •     WM335  = 22 # Released 2018-05-08 Phantom 4 Pro V2
  •     WM240  = 23 # Released 2018-08-23 Mavic 2 Pro/Zoom
  •     WM245  = 24 # Released 2018-10-29 Mavic 2 Enterprise
  •     WM246  = 25 # Released 2018-12-20 Mavic 2 Enterprise Dual
  •     WM160  = 26 # Released 2019-10-30 Mavic Mini   <<< DJI MINI 2               I have tried and tested myself (they use the same controller)
  •     WM231  = 27 # Released 2020-04-28 Mavic Air 2 
  •     WM232  = 28 # Released 2021-04-15 (MAVIC) AIR 2S


now enter This code below into the CMD terminal. (you can copy this code into a notepad and change it


python comm_og_service_tool.py com3 WM160 GimbalCalib JointCoarse

                                                                 ^          ^

     Change these according to your COM# number and Drone model. VERY IMPORTANT!

The code will run and your Drone will calibrate itself. Leave it for 30 SECONDS!!

After that is done, run this code below. 

python comm_og_service_tool.py com3 WM160 GimbalCalib LinearHall

                                                                 ^          ^

     Change these according to your COM# number and Drone model. VERY IMPORTANT!

The code will run and your Drone will calibrate itself. Leave it for 30 SECONDS!!

During each of the "comm_og_service_tool.py" commands your gimbal will bounce around and then hopefully finish with a Summary ending in “result: Pass”.

now your drone is calibrated. ATTENTION now you will still get a Ghost Error code " Gimbal IMU Data error (Code: 40021)" you can ignore it as your drone is in good working order. 

Test & Fly

Hopefully your calibration was successful.  Disconnect the Micro USB and connect your remote along with your phone or tablet.  Your picture should now be level.  I attempted some motions with the drone in my hand and everything looked good.  Next I preformed my pre-flight check and took it up for a quick test flight to verify everything was working as it should and let out a big sigh of relief.


YOU'RE ALL DONE!! TIME TO CELEBRATE. Please comment below if this helped. More interaction will lead more people to the right place with the same Issues. 

Feel free to show your support for helping you by either:

Donating Bitcoin:  3QUiFiXLDHc2EVQeSPBGQFg1Zs5YyYpc21

Interacting with adddddbddddddbddds:

Dropping a Comment and liking post: Helps with engagement 
 
Buying something from amazon using my link: 
https://amzn.to/3oplCG6 (US)    
https://amzn.to/38BlZ9Z (UK)


Sunday 13 July 2014

UNIT 32 P1 - Describe how networks can be attacked - Network System Security


UNIT 32 P1 - Describe how networks can be attacked - Unit 32 Network System Security


UNIT 32 P1 - Describe how networks can be attacked
A computer Virus:
  how networks can be attacked -
A  computer virus is a program that duplicates itself and it spreads itself from computer to computer through the internet. There are many types of Malware and this includes computer viruses such as; Viruses, worms, Trojans, and bots. Viruses have a number of ways to ruin a computer, but most viruses mainly fill up the hard disk space of a computer filing it with useless information which will prevent you from being able to access space you would need in future. When a computer becomes infected by a virus, the virus makes your system slow down tremendously which would lead to software from stop responding, freezes or even corrupting files. Viruses can also automatically make pop ups on your screen faster than you could exist them. If an organisation fell victim to viruses like this, the organisation would have a big problem because their storage will fill up with useless information so they wouldn’t be able to provide a service to the standard the normally preform at nor will they have space for the information that they might need to be saved in

Hacking:
Hacking can either be a hobby or a career in using vulnerabilities in computers or servers to breach into computer systems or websites.  When a hacker weaves their way through a computer system, it is normally to amuse them, to challenge or to compete with other hackers to see who the best is. Hacking is rarely for personal gain, but none the less some hackers have been known to hack into systems to gain profits. The harder a system is for a hacker the more willing they are to hack into the system to prove to themselves. The impact a computer hacker has when they’ve hacked into a computer systems security is immense because they would be able to read, edit, and expose personal data which then puts their privacy at risk. This may also put people at risk of credit card fraud which could be used by the people who hacked in to go on a shopping spree. On the national news there have been many cases where phone hacking acquire information on confidential political information.  This kind of hacking effects politics as people are able to gain information before it is ready to be released to the public. This would also give upper hand to any country if they gain valuable information from other counties.

DDOS
A Denial of service (Dos) attack is an attack to make a computer or network service unavailable to users.  The main reason why they would do this is because they want to shut down a system so the user wouldn’t be able to use their system. This attack is done by someone sending allot of useless traffic to a website to a point where the server would not be able to handle the traffic and crashes.  The effect this would have on an e-commerce business is huge because the company would have to work hard and pay allot of money to get it shorted, this would also mean if the business was a product selling company that they would also be losing the profits they could of made. This would also make customers worried that their financial information could be at risk. 

UNIT 18 D2 - evaluate a database against the specified user need


UNIT 18 D2 - evaluate a database against the specified user need - Testing a Relational Database


UNIT 18 D1 - discuss how potential errors in the design and construction of a database can be avoided - ALL ASSIGNMENTS HERE. PASS, MERITS AND DISTINCTIONS


UNIT 18 D1 - discuss how potential errors in the design and construction of a database can be avoided

>>Download the database for UNIT 18  here<<


Within most things in life people get things wrong which makes things break, become incorrect or even corrupted, and there is no exception for databases. I am going to talk about the fairly common errors within a database that happen and how you can overcome these errors with simple steps.

Accidental deletion of fields
When a database is in use, you may find it really easy to accidently delete data which could mean allot of stress. One main way to avoid this would be to make sure that back-ups are made of the data, so whatever the matter the data will not be completely lost. However, it is very annoying when data becomes deleted because it takes allot of time and effort to retype the data. The best way to stop accidental deletion is to set the database to only the designer can manipulate it, so anyone using the database without authorisation cannot manipulate and is only able to read the database with no risk of deletion.

 Incorrect data types
Incorrect data type issues can occurs when an unmatched data type is used. An example would be, a field called ‘fees’ in a table in a database, it will go wrong is a ‘text value’ is inserted instead of a ‘numerical value’ like ‘two hundred’ instead of ‘200’. This can be avoided as you can tell the database to only allow numerical values to be inputted within that field so this error won’t accrue again. The database won’t allow anything inputted other than numbers. 

Renaming Incorrectly
Renaming something or someone incorrectly on a database can be a huge mistake, hugely if it were to happen to be a bank. This is mostly done by human error as a typo or misheard information. This means if the error isn’t spotted then it will not be sorted out; so a way to sort out the problem is by double checking the information given and typed.

Validation
Validation within computers is on par with people verification checks, but checks the data to see if the data entered is sensible and reasonable. When a user puts information in to a database which might not be right then the computer will do validation checks to see a match between the users input and information given to the database to run though a list of checks. Here is an example: The database is given a set of rules to run by which would be >=18 which means that nothing under the number (age) is allow to carry on to the next step. So if someone that is the age of 17 or under will not be allowed to move forward. So as you can see this helps to validate information allowing and disallowing data which helps to organise the database making sure all the data is correct.


Null Values
The meaning of a null value equals to “nothing there” within a database.  This would be a big problem with the database as the database will not be able to work properly as it doesn’t understand what it is told and might cause other errors within the database.  If the data base has not been set to understand the null values it would carry on to the next step, but to prevent this from happening you can the use of a validation rule. The validation rule will work to stop the null value from happening like in an ‘online application form’ where if no value were to be entered then a user wouldn’t be able to carry on to the next step; the validation rule will work in the same way to stop the null value from accruing and missing values from happening.  

UNIT 18 M4 - Implement an automated function - ALL ASSIGNMENTS


M4 - Implement an automated function

UNIT 18 M4 - Implement an automated function


UNIT 18 M3 - Export data to an external source - ALL ASSIGNMENTS HERE. PASS, MERITS AND DISTINCTIONS


M3 - Export data to an external source


>>Click Here if you want to have UNIT 18 M3 in a word document<<


UNIT 18 M2 - Import data from an external source - ALL ASSIGNMENTS HERE. PASS, MERITS AND DISTINCTIONS


UNIT 18 M2 - Import data from an external source

>>Download the database for UNIT 18  here<<


(you can also do this in a video format)